Monday, April 27, 2015

UMI Control Arms

The new control arms from UMI arrived today.  I ordered new caliper brackets from Kore3 as well, since I made a mistake on the original order and ordered them for a C6 Z51 rotor and not a C6 Z06 rotor.

The UMI upper control arm is on the right and the Spohn is on the left.  There is a noticeable difference in bar location between the two.  I was optimistic when I saw them.


A mockup showed that I have plenty of room.  I have a little rub at what I think is full lock.  I may require some spacers to resolve this.


Mounted the C6 Z06 rotor and the C5 Z06 caliper.  Kore3 calls this a hybrid installation.


Right front wheel mounted.  The brakes fill up the wheel area nicely.  That is it for tonight.  Left front slated for tomorrow.


Saturday, April 25, 2015

Power steering box

Not much to add.  The control arms will arrive Monday, so there was not much to do.  I went ahead and painted the power steering box and mounted it.


Tuesday, April 21, 2015

Fuel tank

Installed the fuel tank and configured the fuel lines.  I might upgrade the wiring from the fuel pump to the relay connector since I am putting in a high performance pump.  Not sure on that one.  We'll see.


Sunday, April 19, 2015

Front Suspension: now with setbacks

An eventful day today: I had borrowed a coil spring compressor from a friend of mine and, obviously, they are as affected by metal fatigue as anything else mechanical.  While attempting to loosen the device while the spring was compressed, the head broke off the bolt and sent everything flying.  The screw part of the bolt bounced off the ground and hit me in the ribs (a glancing blow, but painful nevertheless).  Another lesson learned, and definitely a precursor to the rest of the day.

I bought a new spring compressor and finished putting the passenger side components on.  I went to put the wheel on and noticed it was hitting the top of the upper control arm.  Note: the wheels fit with the factory control arms.  I decided that I might be able to grind off the excess.  I was unable to grind off enough for the wheel to turn.  
Wheel contact


Ground this area
 Another issue is that the "stops" on the lower control arm make contact with the spindle way too soon and would negatively affect the turning radius.  I was going to grind this off, but I decided to stop before I got myself into more trouble.


The bottom line is that it appears the components are for spindles that are intended to lower the car by 1" - 2".  This would raise the centerline of the hub and there would be more clearance between the wheel and the upper control arm.  By grinding on the upper, I made them non-returnable.  Mistake.  I ordered UMI upper and lower control arms.  We'll see how they work.

Saturday, April 18, 2015

The frame - part 2

Got in a groove last night and cranked out some work on the frame.  Installed most of the fuel lines and the rear end.


Leans to the left, since the jackstand on the right is higher.

Close-up of wheel and custom center cap.

Wednesday, April 15, 2015

The frame

I got the frame back from the powder coating place yesterday, but it was an ordeal.  I originally took it to an acquaintance of mine at the beginning of March.  He told me it would take two weeks.  I checked with him two weeks later and he said they got behind and it would take two more weeks.  I stopped by after two more weeks (a month total) and he said they had started it but it would need about two more weeks.  At this point I just said that I would just take it as-is and would pay him what I owed him.  It turns out he did not start on it at all (I owed nothing) and the new place I took it to (Edmunds Metalworking) turned out to be extremely professional and gave me an even better price with an actual two week delivery.  Lesson learned.


I installed the leaf springs, rear brake line, and upper control arms.  The rear end is in place, but not installed because I am waiting for the correct u-bolts for the rear end.  The ones that came on it are too long because the original owner put some lowering blocks on it.  It ended up being too low so he removed them, but he had discarded the factory bolts.


The Spohn upper control arms look good.  I just have them lightly attached for now.  I will crank them down once I get the lowers installed as well as the spindles.


The powder coating looks nice along with the gloss black leaf springs.


Another shot of the leaf springs/shackle combo.


Monday, April 6, 2015

Dash Speakers

I received my speakers today.  I had done some research and most research suggested that I don't replace the dash speakers or replace them with a component setup with the mids in the door and tweeters in the dash.  I decided to simply replace the 4"x 6" dash speakers with 4" JL Audio TR400-CXi speakers rather than take the extra step of installing crossovers, etc.

I ordered them from Crutchfield although they do not list a dash speaker for the S10, I called them, and it is because they do not provide speakers that fit without modifications.  I did some measurements and felt that the TR400's would be the best fit.

I had the windshield out anyway since the cab was repainted so doing this was actually pretty easy.

I removed the grills.  They ended up being broken anyway.  The good news is that replacements are available at the dealership for just about $20 bucks each.  The factory speakers are 10 ohms. 


I placed some Ensolite into the speaker hole over the AC vent tubing to act as a sound deadener.  I didn't use too much: Only about a 6" x 6" section.

The speakers come with an adapter plate to use with an existing 4" x 6" installation.  In order to use them I had to grind off a small plastic tab that is used to fit the OEM speakers properly.  A few seconds with a scotch-brite pad on my die grinder did the trick.

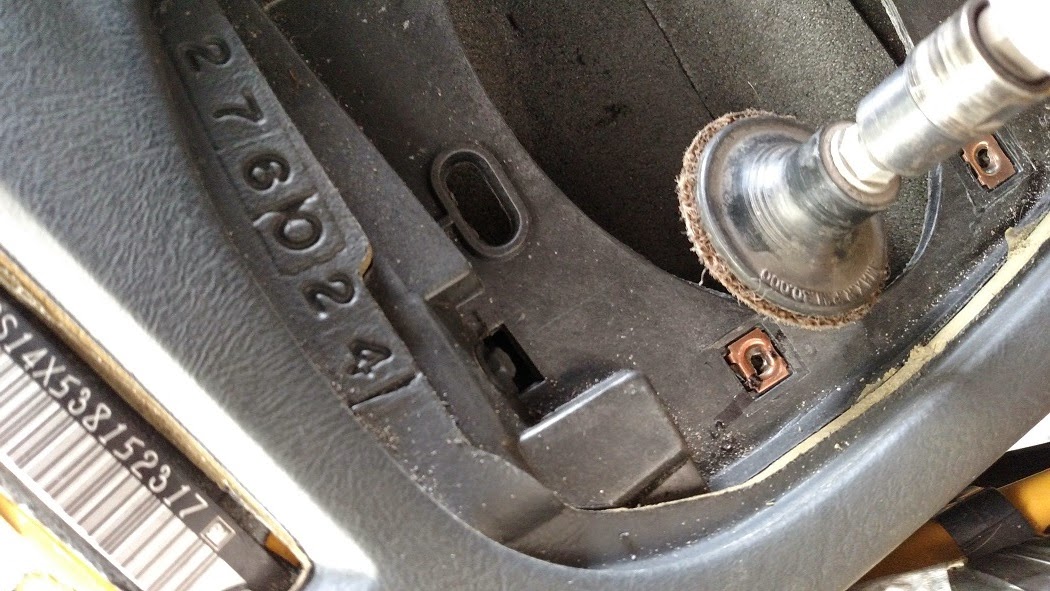
Ground off the tab, just to the right of the nut.  You can also see the ensolite in the speaker hole.

I mounted the adapter plate and installed the speakers with the provided hardware.  Crutchfield also supplied a wiring harness for use with the OEM connector.


The speaker comes with four mounting points, but only two are needed.  The unused tabs are designed to be removed and that is what I did.


Since the adapter plate is about 3/16" think, I had to remove some material from the speaker grill in order to maintain proper fit and finish.  I practiced on the original grills to figure out how much needed to be removed.  Then did the finish work on the new GM grills.  Once again, the scotch-brite/die-grinder combo was very effective.

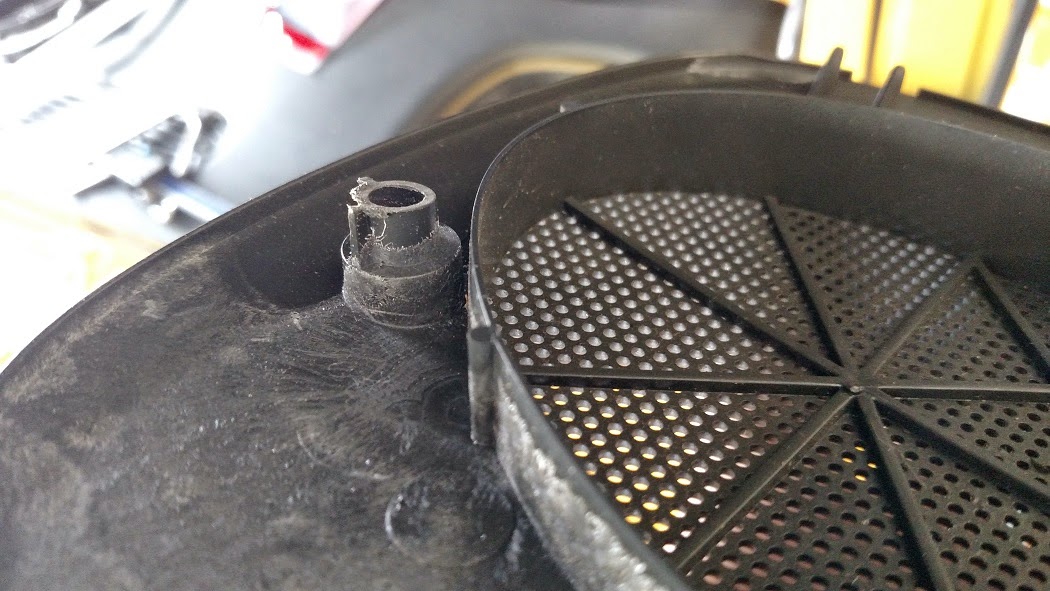
Ground off about 3/16" from the grill mounting points in order to get proper fit and finish

Installed the new grills and it looks as good as new.  We will need to wait a while for how it sounds as the truck is still in a thousand pieces.


Thursday, April 2, 2015

How to convert an S10 fuel pump to run with an LS engine

I have found a lot of info about converting factory S10 fuel pumps to work with LS engines.  There are some ideas I agree with and some I don't.  This is what I came up with for my build.

The 2003 S10 V6 fuel pump module is a Delphi unit (part number FG0123).  The module consists of a pump that sits inside of a bucket.  The bucket is constantly refreshed with fuel from the tank and provides a means to maintain a fuel supply when there is low fuel and hard cornering/acceleration/deceleration is taking place.


FG0123 - Note, I have it already apart and have attached the Racetronix wiring.  This was a mistake.   I will explain later.
The two fuel pumps.  Racetronix FPA-001B on the left, factory pump on the right (you can easily see the two inlets on the factory pump)

The FG0123 is an upgrade from prior versions and has a very nice way of keeping the bucket full. The pump has dual inlets and dual outlets.  One inlet pulls from the tank, the other from the bucket.  One outlet fills the bucket and the other outlet feeds the engine.  The bad part is that the fuel pump only pumps about 90 liters/hr.  This is well short of the 255 liters/hr that a Walbro or Racetronix pump flows and what a high-horsepower LS engine requires.

FG0123 base - Notice the two inlets.

I did a little research and determined I needed the Racetronix FPA-001B pump.  This pump is an upgrade for LS1-powered Camaros and Firebirds.  Apparently, I did not do enough research.  This pump will not work in my module.  Not even close.

I contacted Racetronix and mentioned my dilemma.  They basically stated that I need to find another module.  After much more research, I bought a module from eBay for a 2002 Z28.  I get it and immediately notice how short it is.  It is a good 2 inches shorter than the S10 module.  Plus, the connector for the wiring harness is different.  Damn.

I decided to bastardize it and make it work.  A hybrid approach, so to speak.  I decided I was going to use my S10 module top and the LS1 Camaro base.  So I got to work on Frankenpump.

One thing I want to insert here:  I have seen some posts where people cut a hole in the bucket and just make sure they have a 1/2 tank or more of fuel.  My personal opinion is that the bucket is there for a reason, use it.

The first thing I did was to cut the flaring off at the base of my S10 module (FG0123) and the Camaro module.  The S10 module has its springs in the base.  The Camaro module has its springs between the base and the top.  I could not use the S10 springs.  I could not use the Camaro springs individually since they would be too short.  I decided to double-up the springs and put them on one side.


Flaring on the FG0123 tubes.
No more flaring.

I used a flaring tool to re-flare the ends of the pipes used to hold the base to the top.  The pipes are a very hard steel and it will be very difficult to reflare.  Have patience, it will happen.

I then was able to follow the instructions for the Racetronix pump to be put in to the Camaro base.  All went well until I went to connect the fuel tube that runs from the pump to the top of the module.  It was too short (not surprisingly since it was designed for a Camaro module, not Frankenpump).  I ordered a new 233mm hose from http://autoperformanceengineering.com/html/kits.html.  Note: this hose was a huge pain in the ass to connect to the nipple at the top of the module.  Be prepared to spend some time and harsh language is a must.  
Frankenpump module with the Camaro base and S10 top.  Notice the double springs on one arm.  That black hose took way too long to put on.
After getting that on, I figured I should check the length of the wiring harness.  Same issue, too short.  I decided to use the fuel pump connector on the Racetronix harness with my original wires.  I ended up ordering some terminals from Amazon that matched perfectly (I needed to have the tab on them.  I don't want a terminal sliding out of my fuel pump connector), but took 3 weeks to get here.

New terminals
The terminals showed up and I modified my S10 harness to connect to the Racetronix connector.
Modified S10 harness

Completed Harness

Once that was done I was able to complete the instructions in the Racetronix kit and finish the pump.

Done.

Now to test.  The tank is out of the truck, so I am going to wait until I get the frame back from the powder coating place (that is another story) and mount it before I put fuel in it and test.  Will edit this post when I am done.

Edit: 2/6/2016: The pump works flawlessly at this point.  Truck is going on the dyno this week and we will verify all is well.